
Account Management
Account Management
When you first sign up for Vercel, you'll create an account. This account is used to manage your Vercel resources. Vercel has three types of plans:
Each plan offers different features and resources, allowing you to choose the right plan for your needs.
When signing up for Vercel, you can choose to sign up with an email address or a Git provider.
Sign up with email
To sign up with email:
- Enter your email address to receive the six-digit one-time password (OTP)
- Enter the OTP to proceed with logging in successfully.
When signing up with your email, no Git provider will be connected by default. See login methods and connections for information on how to connect a Git provider. If no Git provider is connected, you will be asked to verify your account on every login attempt.
Sign up with a Git provider
You can sign up with any of the following supported Git providers:
Authorize Vercel to access your Git provider account. This will be the default login connection on your account.
Once signed up you can manage your login connections in the authentication section of your dashboard.
Login methods and connections
You can manage your login connections in the Authentication section of your account settings. To find this section:
- Select your profile picture near the top-right of the dashboard
- Select Settings in the dropdown that appears
- Select Authentication in the list near the left side of the page
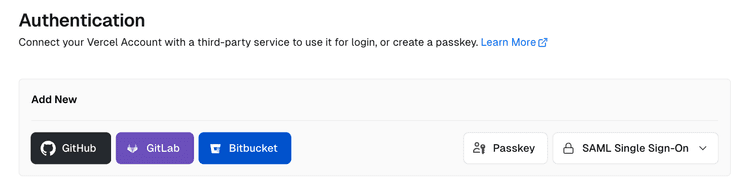
Feature Three
The Authentication section of your account settings.
Login with passkeys
To add a new passkey:
- From the dashboard, click your account avatar and select Settings. In your account settings, go to the Authentication item
- Under Add New, select the Passkey button and then click Continue
- Select the authenticator of preference. This list depends on your browser and your eligible devices. By default, Vercel will default to a password manager if you have one installed on your browser and will automatically prompt you to save the passkey
- Follow the instructions on the device or with the account you've chosen as an authenticator
You can reach our customer support team by emailing info@yourcompany.example.com, calling +1 555-555-5556, or using the live chat on our website. Our dedicated team is available 24/7 to assist with any inquiries or issues.
We’re committed to providing prompt and effective solutions to ensure your satisfaction.
We offer a 30-day return policy for all products. Items must be in their original condition, unused, and include the receipt or proof of purchase. Refunds are processed within 5-7 business days of receiving the returned item.
SAML Single Sign-On enables you to log into your Vercel team with your organization's identity provider which manages your credentials.
SAML Single Sign-On is available to Enterprise teams, or Pro teams can purchase it as a paid add-on from their Billing settings. The feature can be configured by team Owners from the team's Security & Privacy settings.
Choosing a connection when creating a project
When you create an account on Vercel, you will be prompted to create a project by either importing a Git repository or using a template.
Either way, you must connect a Git provider to your account, which you'll be able to use as a login method in the future.
Using an existing login connection
Your Hobby team on Vercel can have only one login connection per third-party service. For example, you can only log into your Hobby team with a single GitHub account.
Managing your profile
For multiple logins from the same service, create a new Vercel Hobby team.
Changing your avatar
To update your personal avatar:
Your new avatar appears when the upload completes.
If you're an Enterprise Managed User, your organization manages your profile, and you can't change your avatar or username yourself.
You can change your personal avatar and username in your account settings.
- Open your account settings.
- In the Avatar section, select your current avatar.
- Choose a PNG, JPEG, or WebP image from your files.
- Adjust the crop and click Set Avatar.
Your username identifies your personal account and its URL namespace,
vercel.com/
- Open your account settings.
- In the Username section, enter your new username using up to 48 characters.
- Click Save.
Vercel displays a confirmation when your username updates.
Teams
Teams on Vercel let you collaborate with other members on projects and access additional resources.
To view another team's projects and resources:
- Open the Vercel dashboard.
- Select the team switcher at the top left of the navigation bar.
- Select the team you want to view from the list of teams you belong to.
To choose which team appears when you first log in or open the dashboard, change your default team.
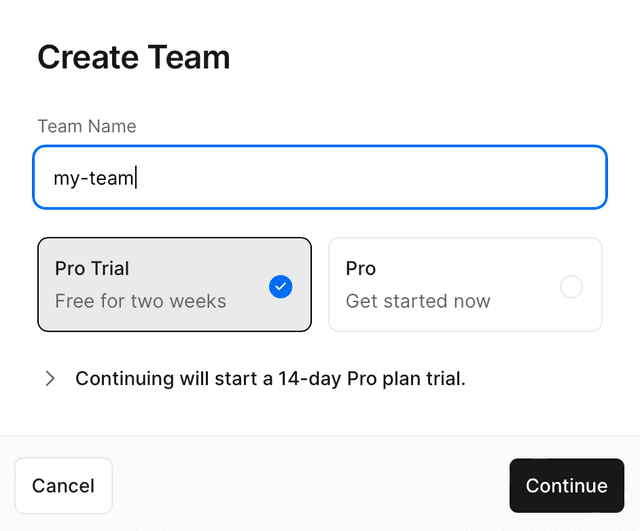
Collaborating with other members on projects is available on the Pro and Enterprise plans.
Upgrade from the Hobby plan to Pro to add team members.
Experience Vercel Pro for free
Unlock the full potential of Vercel Pro during your 14-day trial with $20 in credits. Benefit from Pro features like team collaboration and enhanced analytics.
After creating a new trial, you'll have 14 days of Pro premium features and collaboration for free, except for features limited to paid Pro such as the free first-year custom domain offer (see trial limitations).
You can join a Vercel team through an invitation from a team owner, automatic addition by a team's identity provider, or by pushing a commit to a private Git repository owned by the team. If you have a Vercel account linked to your Git provider, and the team has enabled Auto Approval, you'll be automatically added to the team. If the team has enabled Manual Approval, a team Owner must approve your membership first.
 owner or the last confirmed
member.
owner or the last confirmed
member.
To leave a team:
- If there isn't another owner for your team, you must assign a different confirmed member as the team owner
- Go to your team's dashboard and open Settings in the sidebar
- Scroll to the Leave Team section and select the Leave Team button
- Click Confirm
- If you are the only remaining member, you should delete the team instead
To delete a team:
- Remove all team domains
- Go to your team's dashboard and open Settings in the sidebar
- Scroll to the Delete Team section and select the Delete Team button
- Click Confirm
If you'd prefer to cease payment instead of deleting your team, you can downgrade to Hobby.
Your default team will be used when you make a request through the API or CLI and don’t specify a specific team. It will also be the team shown whenever you first log in to Vercel or navigate to /dashboard. The first Hobby or Pro team you create will automatically be nominated as the default team.
If you delete, leave, or are removed from your default team, Vercel will automatically choose a new default team for you. However, you may want to choose a default team yourself. To do that:
- Navigate to vercel.com/account/settings
- Under Default Team, select your new default team from the dropdown
- Press Save
Your Team ID is a unique and unchangeable identifier that's automatically assigned when your team is created.
There are a couple of methods you can use to locate your Team ID:
- Vercel API: Use the Vercel API to retrieve your Team ID
- Dashboard: Find your Team ID directly from your team's Dashboard on Vercel:
- Navigate to the following URL, replacing your_team_name_here with your actual team's name: https://vercel.com/teams/your_team_name_here/settings#team-id. If you're unable to locate your Team ID using the URL method, follow these steps:
- Open your team's dashboard and head over to the Settings section in the sidebar
- Choose General from the left-hand navigation
- Scroll down to the Team ID section and your Team ID will be there ready for you to copy
Collaboration settings
When someone pushes a commit to a private Git repository connected to your team's project, Vercel determines how the commit author is added to your team based on the collaboration settings. You can configure this behavior in your team's Settings > Members > Collaboration.
There are two approval modes: Auto Approval and Manual Approval.
When a commit author has a Vercel account linked to their Git provider, Vercel automatically adds them to your team with the Developer role. Their deployment then continues immediately.
On the Pro plan, the Developer role is a paid seat. With Auto Approval enabled, anyone who pushes a commit to a private repository connected to one of your team's projects, and has a Vercel account linked to their Git provider, is added to your team as a billed Developer seat with no confirmation step. If you want to decide who becomes a paid member of your team, use Manual approval instead.
Team owners receive a notification when a new member is added through auto approval.
When you enable manual approval, Vercel does not automatically add commit authors with a Vercel account to the team when they commit to your repository. Instead, Vercel blocks the deployment and team owners receive a notification to approve or decline the pending membership.
After approval, Vercel adds the new member to your team with the Developer role. Because the commit author does not join the team until an owner approves the membership, no seat is added or billed for them until approval.
Only grant write access to trusted contributors. In either approval mode, commit authors who are added to your Vercel team receive the Developer role, which gives them visibility into team members, team projects, and other permissions assigned to that role.
Committers without a Vercel account
If a commit author does not have a linked Vercel account, the deployment fails regardless of which approval mode is enabled. The commit author must create a Vercel account and link their Git provider before they can deploy.
Team owners are notified in both approval modes:
- Auto approval: Vercel sends a notification when a new member is automatically added to the team.
- Manual approval: Vercel sends a notification when a new commit author's deployment is blocked and their membership is pending review. You can follow the link in the notification to approve or decline the request.
Members added through collaboration settings receive the Developer role and are billed at the same seat pricing as members added through invitations or identity provider sync. See Pro plan pricing for seat costs.
The approval mode determines when a paid seat is added:
- Auto Approval: a new Developer seat is added, and billed, as soon as an eligible commit author is automatically added to your team.
- Manual Approval: no seat is added until a team owner approves the pending membership. Declining the request adds no seat.
These settings apply to commits pushed to private repositories. Collaboration on public repositories is free.
Managing emails
To access your email settings from the dashboard:
- Select your avatar in the top right corner of the dashboard.
- Select Account Settings from the list.
- Open Settings in the sidebar and scroll down to the Emails section.
- You can then add, remove, or change the primary email address associated with your account.
Adding a new email address
To add a new email address
- Follow the steps above and select the Add Another button in the Emails section of your account settings.
- Once you have added the new email address, Vercel will send an email with a verification link to the newly added email. Follow the link in the email to verify your new email address.
- Once verified, all email addresses can be used to log in to your account, including your primary email address.
You can add up to three emails per account, with a single email domain shared by two emails at most.
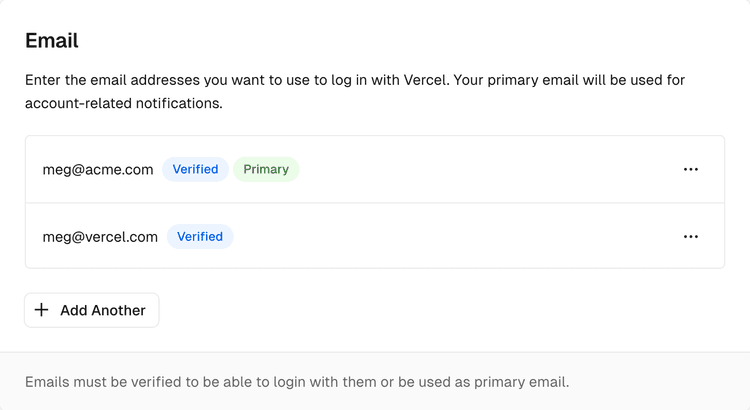
Your account email addresses.
Changing your primary email address
Your primary email address is the email address that will be used to send you notifications, such as when you receive a new preview comment or when you are invited to a team.
Once you have added and verified a new email address, you can change your primary email address by selecting Set as Primary in the dot menu.
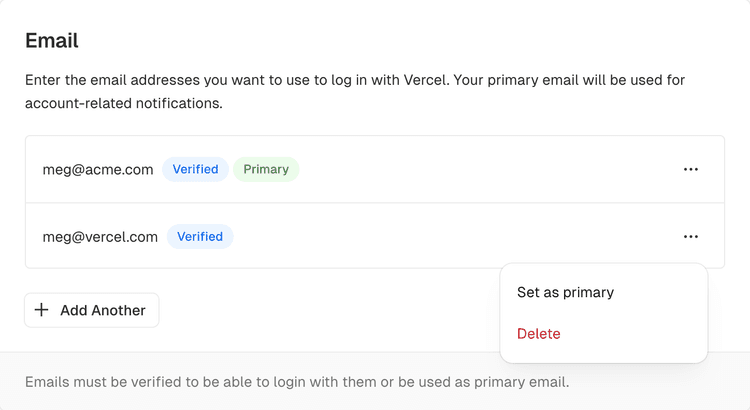
Setting your primary email address.
Removing an email address
Last updated September 8, 2026
To remove an email address select the Delete button in the dot menu.
If you wish to remove your primary email address, you will need to set a new primary email address first.
Cross-link map: Account Management (/docs/accounts)From the Vercel docs graph (built 2026-09-21T05:26:59.511Z), spanning vercel.com docs + KB, nextjs.org, ai-sdk.dev, and other Vercel documentation sites. Full graph as JSON: https://vercel.com/docs/graph.jsonSemantically closest pagesTransition your Hobby team after EMU enrollment — Explains the account update screen EMU members see at SSO sign-in and how to complete it.Troubleshoot project collaboration — Learn about common reasons for deployment issues related to team member requirements and how to resolve them.Teams — Collaborate with your team on projects with shared resources.Managing Team Members — Learn how to manage team members on Vercel, and how to assign roles to each member with role-based access control \(RBACVercel Pro Plan — Learn about the Vercel Pro plan with credit-based billing, free viewer seats, and self-serve enterprise features for proThis page links to (16)Vercel CLI Overview — Learn how to use the Vercel command-line interface \(CLI\) to manage and configure your Vercel Projects from the commandComments Overview — Comments allow teams and invited participants to give direct feedback on preview deployments. Learn more about CommentsDeploying Bitbucket Projects with Vercel — Vercel for Bitbucket automatically deploys your Bitbucket projects with Vercel, providing Preview Deployment URLs, andDeploying GitHub Projects with Vercel — Vercel for GitHub automatically deploys your GitHub projects with Vercel, providing Preview Deployment URLs, and automatDeploying GitLab Projects with Vercel — Vercel for GitLab automatically deploys your GitLab projects with Vercel, providing Preview Deployment URLs, and automaVercel Enterprise Plan — Learn about the Enterprise plan for Vercel, including features, pricing, and more.Vercel Hobby Plan — Learn about the Hobby plan and how it compares to the Pro plan.Vercel Pro Plan — Learn about the Vercel Pro plan with credit-based billing, free viewer seats, and self-serve enterprise features for proUnderstanding Vercel — Learn all about Vercel's Pro Plan free trial, including features, usage limits, and options post-trial. Learn how to manAccess Roles — Learn about the different roles available for team members on a Vercel account.Team Level Roles — Learn about the different team level roles and the permissions they provide.Managing Team Members — Learn how to manage team members on Vercel, and how to assign roles to each member with role-based access control \(RBACVercel REST API Reference — Interact programmatically with your Vercel account using the SDK or direct HTTP requests.List all teams — GET /v2/teams — Get a paginated list of all the Teams the authenticated User is a member of.SAML Single Sign-On — Learn how to configure SAML SSO for your organization on Vercel.Enterprise Managed Users \(EMU\) — Enterprise Managed Users \(EMU\) lets your Vercel team manage the sign-in identity of every member. Members sign in throPages that link here (45)By site: turborepo (1) · vercel-changelog (3) · vercel-kb (3) · vercel-docs (38)From turborepoConstructing CI — Set up CI pipelines with Remote Caching, task filtering, Docker support, and affected package detection for maximum speeFrom vercel-changelogAuto-add Git committers to your teamIntroducing new token formats and secret scanningTag-based cache invalidation now available for all responsesFrom vercel-kbFirewall Terraform Configuration — Learn how to create scalable firewall configurations with TerraformHow do I transfer ownership of a Vercel team? — Learn how to transfer ownership of a Vercel team, including the exact dashboard steps to promote a new Owner and removeUsing TanStack AI with Vercel Sandbox — Run coding agents in isolated Vercel Sandbox microVMs with the @tanstack/ai-sandbox-vercel provider, with durable resumeFrom vercel-docsAccess tokens — Create and scope Vercel access tokens to your full account, a team, or a single project, then use them to authenticate AUsing the Activity Log — Learn how to use the Activity Log, which provides a list of all events on a team, chronologically organized since its crTools — Available tools in Vercel MCP for searching docs, managing teams, projects, deployments, Web Analytics, runtime logs andTanStack AI with AI Gateway — Connect TanStack AI to Vercel AI Gateway with the official adapter to authenticate requests and stream responses from AIPricing for Web Analytics — Learn about pricing for Vercel Web Analytics.Audit Logs — Learn how to track and analyze your team members' activities.Purging Vercel CDN Cache — Learn how to invalidate and delete cached content on Vercel's CDN, including cache keys and manual purging options.vercel teams — Learn how to list, add, switch, invite, and manage your teams with the vercel teams CLI command.Enabling and Disabling Comments — Learn when and where Comments are available, and how to enable and disable Comments at the account, project, and sessionAccessing Deployments through Generated URLs — When you create a new deployment, Vercel will automatically generate a unique URL which you can use to access that partiSharing a Preview Deployment — Learn how to share a preview deployment with your team and external collaborators.Troubleshooting Build Errors — Learn how to resolve common scenarios you may encounter during the Build step, including build errors that cancel a deplTroubleshoot project collaboration — Learn about common reasons for deployment issues related to team member requirements and how to resolve them.Troubleshooting domains — Learn about common reasons for domain misconfigurations and how to troubleshoot your domain on Vercel.Drain Audit Logs to S3 — Learn how to configure AWS IAM and Amazon S3 so Vercel can write Audit Log Drain events to your S3 bucket.Shared environment variables — Learn how to use Shared environment variables, which are environment variables that you define at the Team level and canNext.js on Vercel — Vercel is the native Next.js platform, designed to enhance the Next.js experience.SvelteKit on Vercel — Deploy SvelteKit applications to Vercel and configure the adapter, rendering, streaming, ISR, analytics, and Routing MidRuntimes — Runtimes transform your source code into Functions, which are served by our CDN. Learn about the official runtimes suppoLegacy Usage & Pricing for Functions — Learn about legacy usage and pricing for Vercel Functions.Deploying Git Repositories with Vercel — Vercel automatically deploys supported Git repositories on every branch push and when changes merge into the productionVercel Global Config — A Global Config is a global data store that enables experimentation with feature flags, A/B testing, critical redirects,Managing Global Configs with the Dashboard — Learn how to create, view and update your Global Configs and the data inside them in your Vercel Dashboard at the HobbyManaging Global Configs with Vercel REST API — Learn how to use the Vercel REST API to create and update Global Configs. You can also read data stored in Global ConfigIntegrating Vercel and Kubernetes — Deploy your frontend on Vercel alongside your existing Kubernetes infrastructure.Deploying Nx to Vercel — Nx is an extensible build system with support for monorepos, integrations, and Remote Caching on Vercel. Learn how to deNotifications — Learn how to use Notifications to view and manage important alerts about your deployments, domains, integrations, accounBilling FAQ for Enterprise Plan — This page covers frequently asked questions around payments, invoices, and billing on the Enterprise plan.Global Vercel CLI Configuration — Learn how to configure Vercel CLI under your system user.Static Configuration with vercel.json — Learn how to use vercel.json to configure and override the default behavior of Vercel from within your project.Managing projects — Learn how to manage your projects through the Vercel Dashboard.Sandbox Authentication — Learn how to authenticate with Vercel Sandbox using OIDC tokens or access tokens.Sandbox firewall — Define network policies on sandboxes, preventing data exfiltration.TanStack AI with Vercel Sandbox — Run TanStack AI coding agents in isolated Vercel Sandbox microVMs with the dedicated provider, workspace configuration,Two-factor Authentication — Learn how to configure two-factor authentication for your Vercel account.Vercel Blob — Vercel Blob is a scalable, cost-effective object storage service with private and public access modes for files up to 5Firewall Observability — Learn how firewall traffic monitoring and alerts help you react quickly to potential security threats.Add the Vercel Toolbar to your local environment — Learn how to use the Vercel Toolbar in your local environment.
Previous
We provide 24/7 support through various channels, including live chat, email, and phone, to assist with any queries.
Managing Team Members
Was this helpful?


